

Instructions to Replace a Cracked Ceramic Tile
Tile is regularly utilized as a part of restrooms and kitchens so you presumably have it as a divider covering some place in your home as well. Maybe the same number of things around your home, a few tiles ought to be changed sooner or later as they can create evident breaks.
To start with you need to check whether you put away tiles that were unused when you did your kitchen or restroom. In the event that you can’t discover any, go to the tile store and search for a looking like model. On the off chance that you can’t locate a decent substitution it is possible that, you can purchase a couple bits of differentiating tiles and haphazardly introduce them, supplanting some great tiles as well. Since you’re at the store, recall to purchase cement likewise, the merchant will help you in picking what you require. Coordinating grout is on your shopping list as well in the event that you don’t have remains at home. Here are alternate things you ought to plan before beginning the employment: concealing or painter’s tape, grout saw or utility blade, glass-cutting instrument, nail set and mallet, metal straight edge, chilly etch, putty cut, wood obstruct, a perfect material or wipe and security goggles.
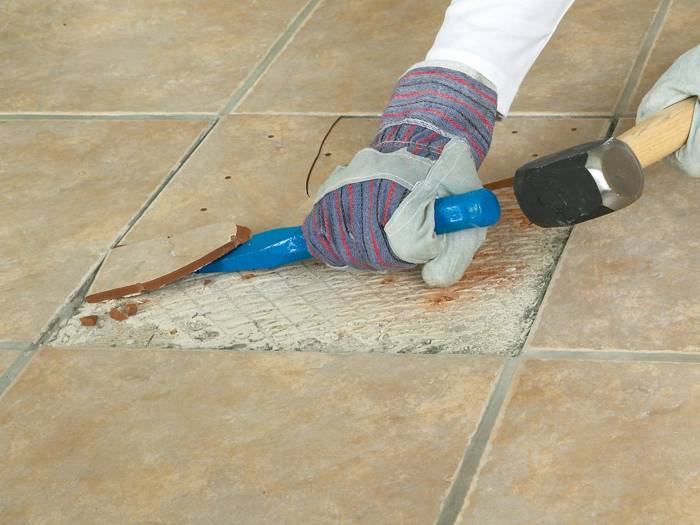
First off, put concealing tape on the encompassing tiles so you shield them from scratching and chipping. Spread daily paper on the floor to make it less demanding for you to clean the room when you are done. The old grout will be evacuated utilizing the grout saw or the utility blade. Utilize the straight edge as a cutting direction and make an X check on the broken tile with the glass-cutting apparatus, from corner to corner. Next, place the nail set where the focal point of the X is and tap with the mallet so that the split tile is extricated. Chip out the tile by utilizing the icy etch and the sledge. In the wake of getting enough little pieces out, you can supplant with a metal end putty cut.
Utilize a point when tapping both, so that what you are doing is lifting the tile and not imprinting the drywall. In the wake of evacuating the tile you ought to do likewise with the old dried cement by scratching it with the putty cut. On the off chance that by slip-up you make a gage in the divider, you ought to settle that before proceeding. Make certain to tidy up the clean before setting the tile. Presently you can spread cement on the back of the tile with the putty blade and set up the tile. Wipe away the tile cement, likewise called mastic, which turns out from underneath the tile. Take the wood piece, put it over the tile with the goal that it ensures it and sledge it until you acquire an even surface. Tape the tile from side to side and all over with covering tape so that the tile is held set up amid the drying procedure. It for the most part takes 24 hours for the mastic to dry. Presently you can grout the creases and apply sealer over the grout for its security when it is dry.
Source : Tile Repair Gold Coast